Walter Teng.
An Extendable Obsidian Publish alternative using Next.JS
Problems with Obsidian Publish Alternatives (from ChatGPT):
Compatibility: Not all Obsidian Publish alternatives may be compatible with all versions of Obsidian or all markdown syntax, which can make it difficult to use certain tools or services.
Ease of use: Some Obsidian Publish alternatives may be more difficult to set up or use than others, which can make it frustrating for new users to get started.
Customization: Some Obsidian Publish alternatives may not offer as much customization as users may want, making it difficult to tailor the appearance and functionality of their published notes to their specific needs and preferences.
Performance: Some Obsidian Publish alternatives may not perform as quickly or smoothly as users may expect, which can make it frustrating to use.
-- ChatGPT
How the linked-blog-starter template addresses these problems:
Compatibility
External / extensible librarieslinked-blog-starter does not reinvent the wheelI'm not a fan of reinventing the wheel, thus, I've searched for the best libraries out there to help me make this website. Here are a few external libraries I used: Converting MD to HTML * obsidian-export (Obsidian MD -> Common MD) * remarkjs (Common MD -> HTML) * github-markdown-css (HTML -> Beautiful HTML) Others: * Obsidian Git to help with publishing notes from within the Obsidian Vault are used to convert Obsidian MD files to common markdown then to HTML
Ease of Use
Obsidian notes work out of the boxworks-out-of-the-box-with-markdown-files* URL paths are generated based on the folder structure and file names * Links to attachments/images automatically work * Metadata can also be passed into the blog and after the setupPublish your Obsidian Notes with linked-blog-starterBy the end of this tutorial, you'll have a github repository that will automatically publish notes to your custom website everytime you upload new notes to the publish folder. Step-by-step instructions to setup your blog 1. Fork the repository linked-blog-starter-md repository. This repository is where the publishing occurs fork-linked-blog-starter-md.png 1. Create a Vercel account then go to your dashboard then (Add New... > Project) 1. Import the repository you just forked 1. In the "Con, publishing notes is done in 2 steps:
- Write a note in
/publishfolder within Obsidian - Run the backup command using the Obsidian Git pluginHow to connect Obsidian Vault with Github1. Clone the repository or "Download As Zip" clone-or-download-github.png 1. Unzip the downloaded folder, then open the folder as a vault in Obsidian 1. Install the Obsidian Git community plugin 1. To publish your notes run the command "Obsidian Git: Create backup" by opening the command palette (CMD/Ctrl + P)
Customization
Create your own templateDeploy a custom version of the linked-blog-starterBy the end of this tutorial, you will have a custom version of the linked-blog-starter that deploys to Vercel Fork the repository and get it to run locally First, we want to fork the linked-blog-starter repo, then install and run it locally. Note: Update https://github.com/matthewwong525/linked-blog-starter with your own repository link 1. Clone this repo by running git clone https://github.com/matthewwong525/linked-blog-starter 1. cd linked-blog-starter 1. npm install 1. npm run dev 1. Go or use someone else's! Changing the template is simple matter of updating one line in your repositoryUpdate the Publish SettingsThere are two things you can modify in the workflow. The publish directory and the blog repository. * BLOG_REPO: Next.JS app repository template that is used to publish your markdown notes. This is useful when you create your own custom linked blog * PUBLISH_DIR: The folder that is published to the linked blog. All files and attachments in this folder will be published on the web Go into .github/workflows/publish.yml in your forked repository forked from linked-blog-starter-md and update the.
- There's also an added feature to add "PreviewLinks" to text outside of markdown files. (See the footer in the example)
Performance
All markdown files are statically generatedstatically-generatedWith Static Generation, tools like Next.js try to render that page mostly like it would in the browser but at compile time. This gives us the ability to serve the entire content on first load. The scripts still hydrate the page during this process, but ideally with fewer changes or no changes at all. https://www.freecodecamp.org/news/static-site-generation-with-nextjs/#:~:text=With%20Static%20Generation%2C%20tools%20like,or%20no%20changes%20at%20all. meaning loading speeds are super speedy!
Getting Started
Demo
https://linked-blog-starter.vercel.app/
Deploy your own
Only deploy through this method, if you want to get a quick server up and running. Otherwise, I'd recommend following the instructions to integrate this with your Obsidian VaultPublish your Obsidian Notes with linked-blog-starterBy the end of this tutorial, you'll have a github repository that will automatically publish notes to your custom website everytime you upload new notes to the publish folder. Step-by-step instructions to setup your blog 1. Fork the repository linked-blog-starter-md repository. This repository is where the publishing occurs fork-linked-blog-starter-md.png 1. Create a Vercel account then go to your dashboard then (Add New... > Project) 1. Import the repository you just forked 1. In the "Con.
Deploy the example using Vercel or preview live with StackBlitz
Create a Custom Fork
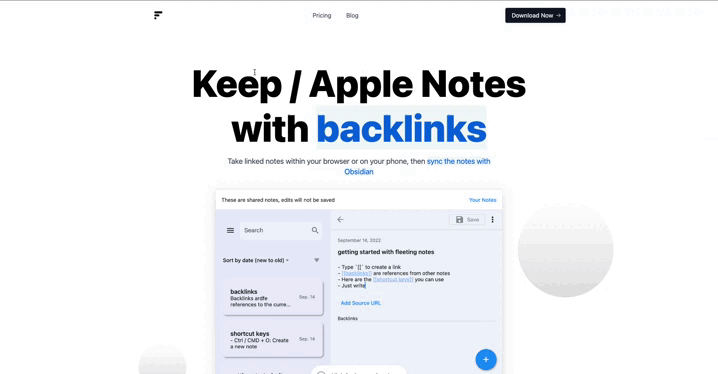
Here is an example of how I forked this repo to create a landing page for Fleeting Notes. See how to deploy a custom version of the linked-blog-starterDeploy a custom version of the linked-blog-starterBy the end of this tutorial, you will have a custom version of the linked-blog-starter that deploys to Vercel Fork the repository and get it to run locally First, we want to fork the linked-blog-starter repo, then install and run it locally. Note: Update https://github.com/matthewwong525/linked-blog-starter with your own repository link 1. Clone this repo by running git clone https://github.com/matthewwong525/linked-blog-starter 1. cd linked-blog-starter 1. npm install 1. npm run dev 1. Go